
TL;DR — Key takeaways on greenhouse design ideas
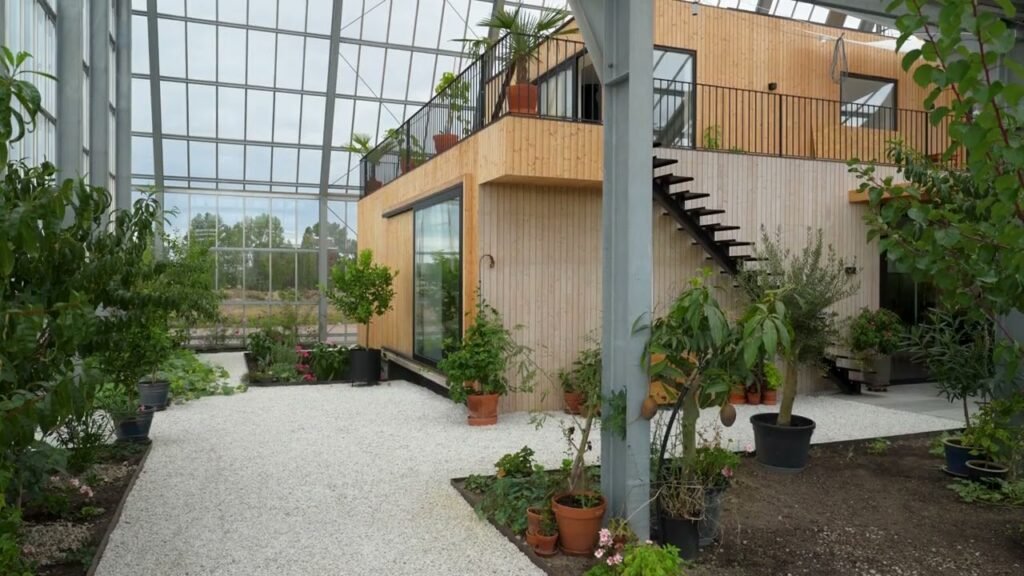
greenhouse design ideas from Rosenlund Naturhus treat the greenhouse as a lived-in ecosystem and a design prototype, not just a plant shelter. The creator explains this thesis early in the video (0:10–0:40) and the channel Real Estate & Interior Design walks viewers through structure, systems and permaculture choices.
Quick list of concrete takeaways demonstrated or highlighted in the video:
- Glazing choice matters: the build mixes glass clarity with polycarbonate insulation (see 1:40–2:05).
- Integrated hydroponics & aquaponics are used alongside raised soil beds (3:15–4:10).
- Ventilation & climate control: passive vents + mechanical fans and staged control (5:00–5:40).
- Irrigation automation with moisture sensors and solenoid valves reduces labor (6:10–6:50).
- Permaculture planting: perennial guilds, companion planting and on-site composting (7:10–7:50).
- DIY materials checklist: timber framing, recycled glass, polycarbonate panels and simple kits (4:50–5:20).
Action items you can do this week (from video timestamps 1:30, 4:00, 8:00):
- Decide glazing: order sample glass panes and polycarbonate sheets to compare light and reflections (1:30).
- Plan a year-round climate control strategy: sketch vents, fans and a heater backed by insulation (4:00).
- Start seeds in raised beds or trays and test a small aquaponic loop (100–200 L) before scaling (8:00).
Watch the original video for the full walkthrough: Real Estate & Interior Design — Greenhouse in Sweden with its own Ecosystem. The creator demonstrates each system and TailorMade Arkitekter is credited for design (0:45).
Project overview: Rosenlund Naturhus — greenhouse as home
The Rosenlund project is a private greenhouse home placed in an agrarian setting south of Vadstena, Sweden. The video opens with landscape shots that show orientation to the field and sun (0:00–0:50). The creator explains that TailorMade Arkitekter designed the structure as a hybrid between dwelling and production greenhouse (0:45–1:10).
From the video scale at 1:15 you can estimate the greenhouse footprint at roughly 100–140 m² (this is an on-screen estimate based on door height and bench spacing). The walkthrough (1:20–2:00) reveals two main internal levels: a ground production area and a mezzanine living/working level, plus a service niche for tanks and systems.
Measurable facts for your planning:
- Estimated footprint: 100–140 m² (based on video scale at 1:15).
- Internal levels: ground production area + mezzanine (walkthrough 1:20–2:00).
- Documentation year: referenced and contextualized for improvements and material prices.
The creator shows how siting, orientation and glazing follow solar patterns across seasons. As the Real Estate & Interior Design video demonstrates, the greenhouse reads as an inhabited ecosystem: you see compost, raised beds, fish tanks and living spaces integrated. TailorMade Arkitekter’s goals (as noted at 0:45) were comfort, food production and year-round usability.
For design references, visit the original video and TailorMade Arkitekter’s site: TailorMade Arkitekter.
Greenhouse design ideas: structure, glazing and materials
The video’s construction shots (1:30–2:10) reveal core structural choices you can adapt: a timber-framed shell with a moderate roof pitch, shallow frost-protected foundation and mixed glazing panels. The creator explains why timber was chosen (aesthetic warmth, low embodied energy) while polycarbonate and glass are used pragmatically in different zones.
Two immediate design decisions you must make are frame type and glazing strategy. Rosenlund uses timber for visual and thermal benefits while courting higher upfront cost. The roof pitch is modest—enough for snow shedding in Sweden—so plan for a pitch that matches local snow-load; the video shows the roof behavior at 1:30.
Material lifecycle and cost notes (2026 context): timber framing has lower embodied carbon but needs treatment if near moisture. Recycled glass panes provide excellent light and long service life but have higher upfront cost and fragility. Insulated polycarbonate offers a lower installed cost per m² and improved R-values; the video indicates these trade-offs around 2:05–2:45.
Practical steps you can follow now:
- Choose frame: timber for permanence and aesthetics, aluminium/galvanized steel if you need high strength and low maintenance.
- Decide glazing zones: use single/double glass where light clarity matters (propagation, living areas) and twin-wall polycarbonate for insulation on north walls.
- Detail foundation: frost-protected shallow foundation with anchoring bolts and a continuous moisture barrier (see construction clips 2:20–2:45).
For product info, compare polycarbonate panels from manufacturers like Palram and twin-glazed units from typical fenestration suppliers. The creator references material choices and trade-offs in the clip at 2:05; visit the video to see reflections and how light diffuses in each zone.
Glazing: glass vs polycarbonate panels
The video explicitly contrasts glass panes (visible at 1:40) with polycarbonate panels (visible reflections at 2:05). Each has measurable thermal and optical properties that affect plant growth, heating load and lifecycle cost. When comparing, use clear metrics: U-values (W/m²K), light transmission (%) and impact resistance.
Key performance numbers to use (2026 reference): typical double-glazed glass U-value is approximately 1.8–2.8 W/m²K. For 8–12 mm twin-wall polycarbonate, expect an equivalent R-value range that translates to roughly U ≈ 0.8–1.7 W/m²K depending on thickness and air cavity. Light transmission: clear annealed glass transmits ~90% of PAR; clear polycarbonate transmits ~80–90% depending on pigment and coating.
Actionable advice to choose glazing by climate and budget:
- Calculate solar gain: map sun hours on your site for winter and summer. In Sweden, maximize winter solar gain on southern glazing.
- Weigh upfront cost vs insulation savings: polycarbonate costs less per m² and reduces heat loss; glass offers better light quality but higher replacement costs.
- Test samples: order 30×30 cm samples of both materials and mount them in-situ for hours to inspect glare, reflection and condensation (use the shots at 2:05–2:30 as a model).
Two quick data points to remember: double-glazed glass U ≈ 1.8–2.8 W/m²K, and 8–12 mm twin-wall polycarbonate R ≈ 0.6–1.3 m²K/W (so U roughly 0.8–1.7 W/m²K). Those values will shift with profile, coating and installation quality.
Practical tip: use glass in propagation and living areas where seed color fidelity and visual clarity matter, and polycarbonate on north-facing walls and roof sections where insulation is prioritized.
Framing, foundation and sustainable materials
Rosenlund shows a primary timber frame (1:50–2:10). Timber works well for embodied-carbon goals and offers easier on-site modification. If you expect high humidity, consider corrosion-resistant metal for long-term durability or pressure-treated timber with proper detailing to avoid rot.
Step-by-step build checklist derived from the video and construction clips (2:20–2:45):
- Site prep: clear and level the plot, check solar orientation and drainage.
- Foundation: install a frost-protected shallow foundation—insulated footings down to local frost depth or use a perimeter footing with at least mm rigid insulation under the slab.
- Anchor & moisture barrier: set anchor bolts into the footing, lay a continuous polyethylene moisture barrier and compacted gravel base for drainage.
- Framing & bracing: erect treated timber posts, add diagonal bracing and prepare for glazing supports.
Cost-effective material suggestions (2026): reclaimed or locally milled timber can cut framing costs by 20–40% and reduce embodied energy. Invest in high-quality glazing seals and gaskets—where you save on aesthetics, don’t scrimp on long-life weathering details. The video shows compromises: timber for appearance and polycarbonate for cost-effective insulation (2:05–2:45).
Useful links: compare local suppliers and reclaimed material marketplaces. For cost comparison guides, see manufacturer pages like Palram (polycarbonate) and local timber specialists. The Real Estate & Interior Design video credits TailorMade Arkitekter for detailing choices (0:45).
Integrated ecosystem: hydroponics, aquaponics and raised beds
One of Rosenlund’s most tangible lessons is integration: the greenhouse mixes raised soil beds, small hydroponic channels and an aquaponic loop visible between 3:15–4:10. The creator demonstrates how soil systems and tank-based production support each other, reducing external inputs and turning waste into fertility.
Design essentials you should plan with numeric targets:
- Reservoir sizing: for aquaponics, use a fish tank that is ~30–50% of the grow bed volume by volume. If your grow beds total L, target a 150–250 L fish tank to start.
- Pump specs: a reliable submersible pump providing 2–4 turnovers per hour of total system volume is common. For a L system use a pump delivering 1,000–2,000 L/h.
- Fish-to-plant ratio: a conservative starting ratio is kg fish biomass per 2–3 m² of grow bed surface for leafy greens; adjust as you learn system nitrification and feeding rates.
Numerical nutrient tips for hydroponics: maintain EC 1.2–2.0 mS/cm for vegetables and pH 5.8–6.5. For aquaponics, target pH 6.8–7.2 and keep ammonia below 0.25 mg/L once cycled.
Step-by-step setup for beginners (practical sequence):
- Set up a small ebb-and-flow tray or NFT channel and run nutrient solution for week to measure evaporation and refill needs.
- Install a 100–200 L fish tank with basic aeration and a pump. Cycle the system using fishless methods or start with hardy stock like goldfish to develop nitrifying bacteria.
- Monitor water quality daily for ammonia, nitrite and nitrate for the first 6–8 weeks; grow a few lettuce heads to observe plant uptake.
The video demonstrates the physical layout (3:40–4:00) so you can mimic bench heights and plumbing runs. The creator recommends testing a small loop before scaling—a practical tip you should follow to avoid large system failures.
For starter guides, see practical hydroponics resources like Epic Gardening’s hydroponics guide which offers pump sizing charts and nutrient ranges.
Climate control, ventilation systems and grow lights
The video shows a blended ventilation strategy: passive side vents, roof/ridge vents and a few mechanical fans for rapid purge (5:00–5:40). The creator demonstrates staged venting based on internal temps and humidity at 5:20; you can automate this pattern with thermostats and humidistats.
Practical ventilation and control specs:
- Fan sizing: plan for 20–40 CFM per m² (≈40–80 m³/hr per m²) as a baseline; increase for high-transpiration crops or tropical trials.
- Thermostat set points: staging: open vents at 18–20°C, run fans above 24–26°C, and reduce ventilation below 10°C in winter to conserve heat.
- Staged venting schedule: daytime cycle: vents open with increasing solar gain; night: close vents and use thermal mass to buffer temperature swings (video demo at 5:20).
Lighting choices: the video shows natural light dominating, with minimal electric lighting visible (5:45–6:05). For overwintering and supplemental light, use LED grow lights sized at 25–35 W/m² for leafy greens and up to 50–70 W/m² for fruiting crops to maintain yields under short photoperiods.
Photoperiod guidance:
- Leafy greens: 14–18 hours of light at lower intensity (20–30 µmol/m²/s additional PAR if using LEDs).
- Fruiting crops (tomato, cucumber): 14–16 hours at higher intensity; supplement with HPS only if you need very high PAR and have the ventilation to handle heat.
Actionable control setup: pair thermostats with automated vent actuators and variable-speed fans. The creator displays simple wired thermostats in the mechanical niche; mimic that wiring and include remote monitoring if you plan away-from-site winter care.
Irrigation, automated systems and sensors
Rosenlund demonstrates multiple irrigation methods: drip lines for established plants, capillary mats for seed trays and occasional hand-watering for delicate seedlings (6:10–6:40). The creator highlights automation elements—moisture sensors, programmable controllers and solenoid valves—visible in the utility bay (6:30–6:50).
Essential automated components and wiring plan:
- Moisture sensors: use volumetric sensors at root-zone depth; place one sensor per irrigation zone (10–20 m² per sensor).
- Solenoid valves & manifolds: fit each irrigation zone with a valve controlled by a central controller; include manual override valves.
- Controller: a programmable 4–8 zone controller with Wi‑Fi for remote schedules and data logging.
Step-by-step automation setup:
- Map irrigation zones by plant type and drainage—seed trays, raised beds, vertical racks.
- Install drip or micro-spray lines with pressure regulators; capillary mats under seed trays for gentle, uniform moisture.
- Wire moisture sensors to the controller and program threshold-based watering (e.g., water when sensor reads 20% volumetric water content).
- Add a UPS or small backup battery to keep controllers and valves functional during short outages.
Bill-of-materials (small system example):
- 1× 4‑zone controller (~€120–€250)
- 4× solenoid valves (~€25–€60 each)
- 4× moisture sensors (~€30–€80 each)
- 1× pump (1,000–2,000 L/h, €80–€200)
Estimated small-system cost: €350–€900 depending on brand and number of zones. The video’s automation examples are modest but effective (6:30–6:50); copy their zone logic and test each sensor and valve before trusting the system unattended.
Planting strategies: permaculture, companion planting and crop rotation
Rosenlund applies permaculture principles inside the greenhouse: perennial zones, mulch layers and an on-site composting corner supply that slowly releases nutrients (7:10–7:50). The creator explains that the greenhouse is not only for annual vegetables but also for year-round edible landscaping.
Practical permaculture tactics you can use:
- Guild planting: group perennial herbs, nitrogen-fixing plants and beneficial flowering species near long-term beds to support pollinators and pest predators.
- Mulch & compost: maintain 5–10 cm of mulch on beds and a hot compost cycle to feed soil microbes—use greenhouse trimmings and kitchen waste where possible.
- Companion planting examples: basil with tomatoes, marigolds with peppers, and chives near brassicas to deter pests—these pairings are visible in the footage (7:30–8:00).
Seed starting techniques and timing (practical schedule):
- Leafy greens: start 4–6 weeks before transplant into beds; maintain hours light and 18–22°C day temps.
- Tomatoes/cucumbers: start 6–8 weeks before last frost under 20–24°C and harden off over days.
- Perennial herbs: propagate by cuttings or transplant in early spring; maintain steady moisture and avoid over-fertilizing.
Crop rotation and organic pest management suggestions:
- Adopt a simple 3-year rotation: leafy greens → fruiting crops → legumes/perennial recovery to balance nutrients and break pest cycles.
- Use beneficial insects (ladybugs, predatory mites) and homemade compost tea for foliar feed—follow dilution rates of 1:10 for compost tea applications once every 2–4 weeks during the growing season.
The creator’s emphasis on organic practices is visible in tool use and composting areas. Embrace the same observability: track pest presence weekly and rotate bed placements annually to minimize disease pressure.
Space optimization: vertical gardening, greenhouse shelving and garden tools
Rosenlund maximizes productive area using tiered benches, wall-mounted planters and a few mobile shelving units (8:00–8:30). This is essential if you have 10–40 m² of floor area and want to increase output per m². The video provides good visual cues for bench heights and circulation aisles.
Exact measurements and load specs you can use when building shelves:
- Bench height: 80–90 cm for ergonomic working height.
- Bench depth: 60–90 cm for single-sided benching; 120–150 cm for double-sided aisles.
- Load rating: design benches for 120–200 kg/m² if you expect heavy pots and water-filled trays.
Tools checklist for a productive greenhouse (must-have items):
- Propagation trays & domes
- Hand trowel & hori-hori knife
- pH meter & EC meter
- Pruning shears, plant ties and labels
- Small bench-scale compost bin
DIY kit and small projects to increase space:
- Hanging baskets for strawberries and herbs—use 25–30 cm pots hung above bench height.
- Pallet planters on vertical walls—reinforce with waterproof liners and 30–40 kg load allowances per pallet.
- Modular benching: build mobile bench frames on lockable casters to reconfigure space seasonally (video shows mobile units at 8:00).
For suppliers, consider modular greenhouse bench kits and pallet planter tutorials from horticultural retailers. The video models effective layouts you can adapt for 10–40 m² footprints and a mix of shelving solutions to maximize plant selection and edible landscaping.
Energy, costs and local climate considerations
Sweden’s climate strongly influenced Rosenlund’s choices: southern glazing orientation for winter solar gain, insulated panels on the cold side, and thermal mass inside for night buffering (9:10–9:40). The creator explains that winter strategies must balance insulation and solar access to sustain year-round production.
Renewable integrations and payback windows (2026 estimates):
- Rooftop solar: a 3–5 kWp rooftop array sized for a m² greenhouse can offset lighting and pumps; typical payback in Sweden is 6–10 years with current incentives.
- Thermal storage: use 1,000–2,000 L water tanks as thermal mass; one tonne of water stores ~1.16 kWh per °C change—useful overnight buffer.
- Passive-solar glazing: payback for higher-insulation glazing is longer but reduces ongoing heating demand by 20–35% compared to uninsulated single glazing.
Cost breakdown template (range estimates for 2026):
- Small DIY polycarbonate (20–40 m²): €2,500–€6,000 (materials & basic systems).
- Medium timber-framed (80–140 m²): €15,000–€45,000 (higher if glazing and systems are premium).
- Large integrated greenhouse-home: €50,000+ depending on living finishes and HVAC.
Lifecycle maintenance: expect annual maintenance ≈ 1–3% of build cost for minor repairs, seal replacement and system checks. The video’s project shows investment in durable materials on primary structure and savings on secondary elements like shelving and internal partitions (9:40–9:50).
Where to cut costs safely: use reclaimed wood for non-structural benching, choose mid-grade polycarbonate instead of full glass for north walls, and prioritize sealing and insulation to reduce heating needs. Where to invest: ventilation controls, pump reliability and glazing seals—these reduce failure risk and operating costs.
DIY checklist, case study takeaways and FAQ
This compact plan is inspired by Rosenlund’s construction clip (4:50–5:20). Timeline: weekend assembly for a 10–20 m² kit; 2–4 weeks for foundations and systems.
- Materials: timber posts, pressure-treated base plates, twin-wall polycarbonate panels, glazing gaskets, screws, anchor bolts, drip irrigation kit, a 1,000–2,000 L/h pump and basic thermostat/vent actuators.
- Assembly steps: 1) Lay frost-protected base, 2) anchor sill plates, 3) erect frame, 4) install roofing purlins and glazing, 5) set benches and plumbing, 6) commission pumps and controllers.
- Timeline: Site prep (2–4 days), foundation (3–7 days), frame & glazing (2–3 days for a small kit), systems & finish (2–5 days).
Case study takeaways
Track these measurable outcomes to evaluate performance (observables in the video):
- Crop yield per m²: aim for 3–6 kg/m²/year for leafy greens in a well-run winterized greenhouse.
- Temperature stability: measure daily variance; successful designs keep swings within ±6–8°C overnight using thermal mass and insulation.
- Maintenance hours: expect 4–12 hours/month for a medium-sized integrated system; time falls as automation and routines improve.
FAQ — quick answers
The video covers many PAA-style questions (9:50 and throughout). See the FAQ block below for commonly asked items and refer back to the original video: watch here.
Further reading and resources referenced in this article:
- Original video — Real Estate & Interior Design: Greenhouse in Sweden with its own Ecosystem.
- TailorMade Arkitekter (project designers): tailormadearkitekter.se.
- Hydroponics starter guide — Epic Gardening: epicgardening.com/hydroponics.
- Polycarbonate product info — Palram: palram.com.
- Permaculture primer — Permaculture Research Institute: permaculturenews.org.
The creator demonstrates many of these steps on camera; rewatch the construction and systems clips at 4:50–5:20, 3:15–4:10 and 6:30–6:50 for direct visual guidance.
Conclusion — key takeaways and next steps
Rosenlund Naturhus redefines what a greenhouse can be: a lived-in production space, a system integrator and a design prototype. The Real Estate & Interior Design video shows how glazing, integrated aquaponics/hydroponics and permaculture planting come together to create year-round yields (see 0:10–0:40 and 3:15–4:10).
Actionable next steps you can take this month:
- Order glazing samples and compare light and insulation (refer to 2:05–2:30).
- Sketch a 2‑zone system: one raised bed + one small aquaponic loop (100–200 L) and test cycles for 6–8 weeks.
- Buy a basic automation starter kit: 4‑zone controller, one solenoid valve, one moisture sensor and a 1,000 L/h pump; wire and test under load.
As the creator emphasizes, start small and iterate: test materials, test water cycles and track simple metrics like yield/m² and monthly maintenance hours. For the complete walkthrough and design inspiration, return to the original video: Real Estate & Interior Design. TailorMade Arkitekter’s approach remains a practical template you can adapt for budgets and local climates.
Frequently Asked Questions
How much does a greenhouse like Rosenlund Naturhus cost?
You can build a functional hobby greenhouse similar to Rosenlund for roughly €4,000–€12,000 depending on size, glazing and systems. The video shows a high-end private greenhouse/home, so expect costs to rise if you add full aquaponics, insulation and renewables. For a 20–40 m² DIY polycarbonate greenhouse, budget €2,500–€6,000. For a 80–140 m² timber-framed, partially glazed structure with mechanical systems, budget €15,000+. See the energy & cost section for a payback estimate and the original video for context: Real Estate & Interior Design.
Can I use aquaponics in cold climates?
Yes. The creator demonstrates an aquaponic loop inside Rosenlund (video 3:15–4:10) and the approach works in cold climates if you size the reservoir, add winter heating and use hardy fish species. Use insulated tanks, a 300–600 W heater for small systems in sub-zero nights, and maintain water temps 18–24°C for tilapia alternatives or choose trout/whitefish for cold systems. Start small (100–200 L fish tank) and test one cycle before scaling.
Which glazing is best for Sweden — glass or polycarbonate?
The video compares glass and polycarbonate glazing (1:40–2:05). For reference: typical double-glazed glass U-values run ~1.8–2.8 W/m²K (lower is better), while 8–12 mm twin-wall polycarbonate gives an R-value equivalent of roughly 0.6–1.3 m²K/W (or U ≈ 0.8–1.7 W/m²K depending on thickness and air gaps). Choose glass for maximum light/clarity and polycarbonate for insulation and impact resistance.
What ventilation and thermostat settings are recommended?
Typical ventilation spec: plan for 20–40 CFM per m² of greenhouse floor area as a starting point, higher for warm-season crops. The video demonstrates passive ridge vents and mechanical fans (5:00–5:40). Use thermostats set to 18–22°C for spring/autumn, and protect overnight down to 2–5°C in winter with thermal mass and supplemental heat.
What are the best seed starting techniques for greenhouse crops?
Start seeds in warm raised beds or propagation trays 6–8 weeks before last frost for warm-season plants. The video shows seed starting in raised soil beds at 8:00. Use a heat mat (20–25°C), 16–18 hour photoperiod for vegetables, and transplant when seedlings have 2–4 true leaves. Harden off over 5–7 days inside the greenhouse before moving outdoors.
Key Takeaways
- Treat your greenhouse as an ecosystem: integrate soil beds, hydroponics and aquaponics before scaling.
- Choose glazing by function: glass for light clarity, polycarbonate for insulation—test samples on-site.
- Prioritize ventilation automation and thermal mass to maintain year-round climate in cold regions.
- Start small with pumps and fish tanks: a 100–250 L aquaponic loop lets you learn without high risk.
- Save on non-structural elements (benches, shelving) and invest in reliable pumps, seals and controllers.