TL;DR — Key takeaways for DIY greenhouse design (quick summary)
DIY greenhouse design starts with three big decisions: how big and tall to build, where to site it, and what cover to use. The creator explains these three core planning decisions at 04:00–09:00 in the original video.
Top actionable steps from the video and this article:
- Pick a flat site (≤5% slope) to save on leveling and foundation costs — see creator’s orientation and slope notes (05:50–06:00).
- Decide height: 7′ is a minimum for a 6′ person; 8′ is recommended for comfort and standard lumber lengths (04:00–05:00).
- Choose cover: polycarbonate is recommended for insulation and ease of cutting (06:40–08:30).
- Plan ventilation and irrigation before you build — these systems are harder to add later (10:30–11:20).
The video (https://www.youtube.com/watch?v=TjfwegTGYKc) and The Ripe Tomato Farms channel page are linked for visuals and step-by-step clips; this article (updated for 2026) expands on hydroponics, vertical gardening, smart automation, landscaping, and unconventional materials to help you design a smart, sustainable, cost-effective greenhouse.

Why build a greenhouse? Benefits, season extension & what the video shows
The Ripe Tomato Farms video opens by showing the core benefits: earlier starts and later harvests in cool climates (00:00–00:40). The creator explains greenhouses protect crops from storms, hail and wind and let you grow tropical or out‑of‑zone crops (00:40–01:20).
Key data points to weigh:
- Season acceleration: Stable greenhouse conditions can speed crop maturity by up to 30–40% for many vegetables (creator notes 2‑month accelerations for some crops in the transcript).
- Insulation: Polycarbonate cover panels can roughly double the R‑value versus single‑pane glass (07:45–08:15).
- Workability & throughput: In the video the creator used the greenhouse to raise thousands of starter plants in zone 9 (01:20–02:20), showing how critical capacity can be for small commercial operations.
Concrete takeaways:
- Estimate how many extra harvest weeks a greenhouse will give you in your USDA zone — this helps value the build.
- List three immediate benefits you want (starter plants, storm protection, off‑season production) and rank them by dollar or time value.
- Compare kit vs DIY costs: kits reduce labor and errors; DIY often reduces cash outlay but can cost more in materials and time.
Actionable next steps: spend one hour mapping your growing goals (starter sales, vegetable supply, or tropical experiments), then check the video at 01:20–02:20 to see how the creator’s usage influenced his material and layout choices.
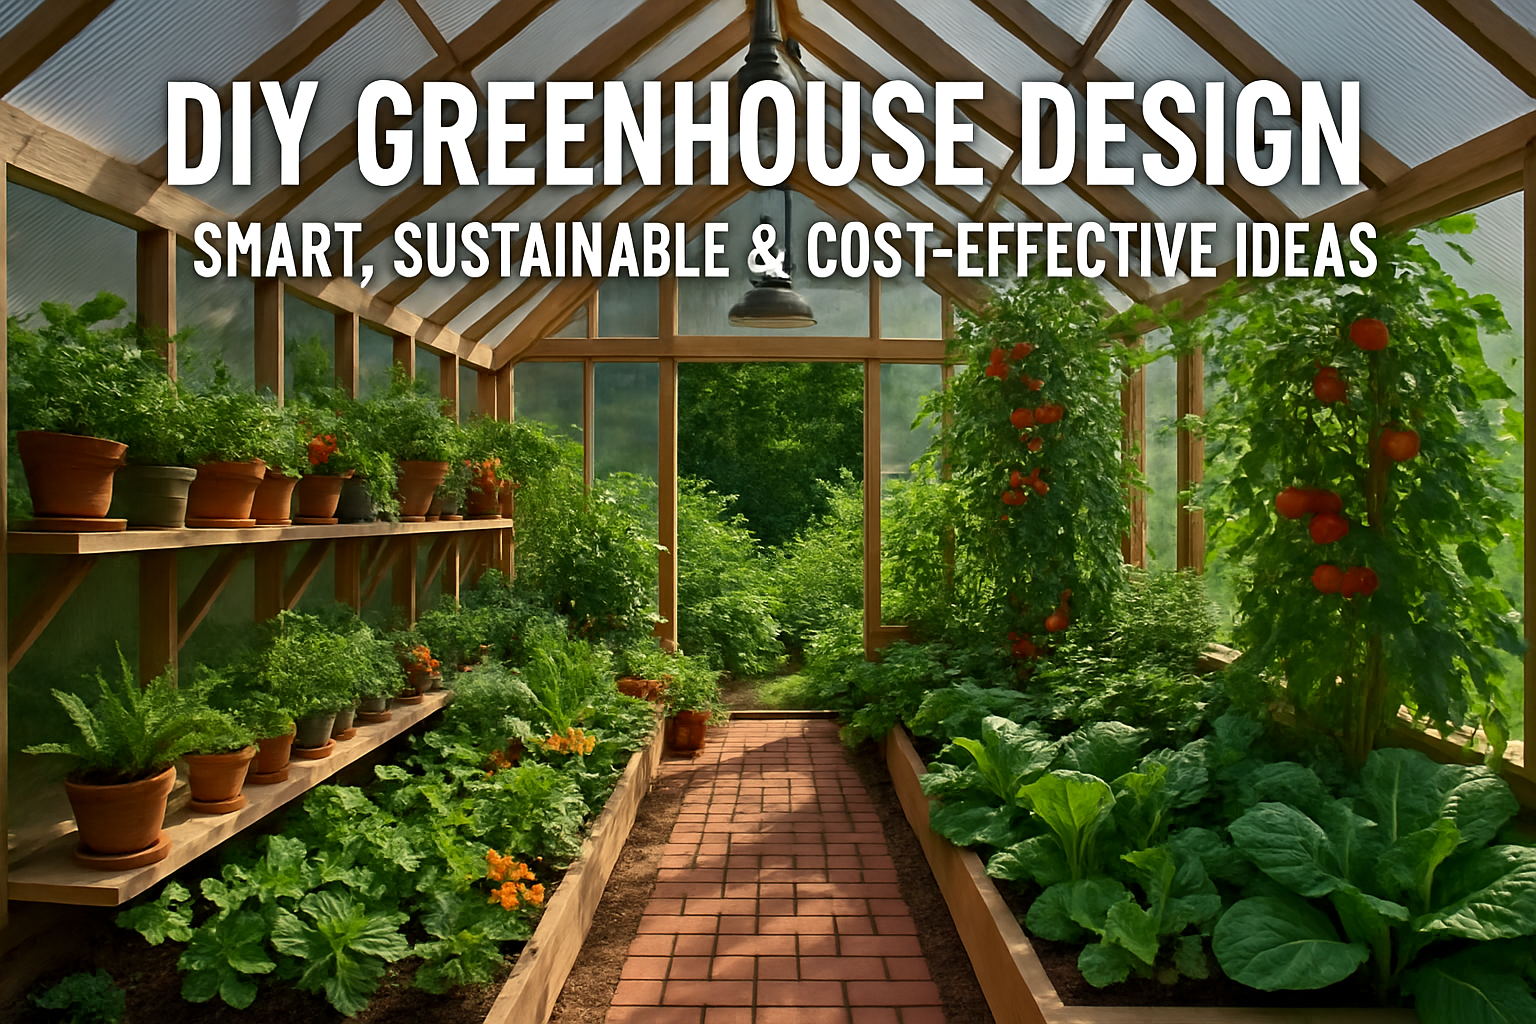
Size and height decisions: ergonomic design and usable area for DIY greenhouse design
The creator explains sizing rules and headroom: 7′ is the bare minimum for a 6′ person, but 8′ is often better because dimensional lumber and standard board lengths align (04:00–05:00). That simple decision saves cutting and waste.
Design advice and metrics you can use now:
- Bench & aisle rules: keep bed widths ≤4′ for comfortable reach; aisles ≥3′ to roll a cart or wheelbarrow.
- Common widths: 8′, 10′, 12′, 20′ are typical; each width changes bench layouts and material needs.
- Material cost impact: taller greenhouses increase wind load and materials by roughly 10–25% depending on span and wind exposure.
How to prototype a layout in 4 steps:
- Measure your available footprint and add 1–2′ clearance on all sides for maintenance.
- On 1/4″ graph paper, draw the greenhouse outline and mark benches (≤4′ wide) and a 3′ central aisle.
- Place propagation benches near the door for quick access and utilities (power/water).
- Decide fixed vs mobile benches — mobile carts reduce initial footprint needs but add handling labor (the creator mentions a mobile cart alternative at 05:00–05:20).
Exact material considerations to list on your shopping sheet: 2×4 studs for framing, 4×4 posts for corners, 2×6 ridge/headers if spanning >10′, 8′ lumber lengths to match an 8′ wall height. This section includes ergonomic rules, cost impacts, and practical steps so you can sketch a usable plan today.
Choosing location & orientation for max light, airflow and sustainable siting
According to The Ripe Tomato Farms, place your greenhouse on the south side of obstructions in the northern hemisphere (and north side in the southern hemisphere) to maximize sun exposure (05:20–06:10).
Orientation rules that affect heat and airflow:
- East–west long axis: If your greenhouse is rectangular and you want maximum winter light, run the long side east–west so the long face points south (05:20–06:10).
- North–south orientation: In warm climates, choose north–south to maximize cross-ventilation and reduce overheating (06:10–06:40).
- Slope metrics: aim for a site with ≤5% slope to avoid heavy grading and foundation expense (05:50–06:00).
Actionable site‑selection steps (do this now):
- Map shade with a smartphone: take photos or a sun‑path app at 9am, noon, and 3pm on a typical day — mark persistent shade sources.
- Use a line level or topo app to check slope; if >5%, either terrace the site or choose another spot.
- Select orientation by climate: cool climates → east–west; hot climates → north–south.
Two specific data points: reducing grade work by choosing a flatter spot can save 20–50% of early labor/soil costs; better orientation alone can reduce seasonal heating needs by up to 10–15% depending on glazing and insulation. The video’s orientation and slope guidance (05:20–06:40) is a practical baseline — use these steps to pick a spot that minimizes maintenance and operating energy.
DIY greenhouse design: Structure and materials — wood, metal, plastic and cover choices
The creator outlines three structural options: wood framing with 2x4s, metal (steel studs or piping), or plastic systems (PVC/ABS) for portable greenhouses (06:40–07:30). Each has clear tradeoffs.
Cover material comparisons and data:
- Polycarbonate: twice the R‑value of single‑pane glass; common in two‑wall panels (e.g., 2’×4′) that offer impact resistance and insulation (07:45–08:15).
- Glass: excellent light transmission and longevity but heavier and needs sturdier framing and higher labor costs.
- Plastic sheeting/fiberglass/acrylic: cheaper but less durable and lower insulating value.
Unconventional and cost‑saving ideas (beyond the video):
- Reclaimed windows: salvage old double‑pane windows for walls; retrofit with weatherstripping.
- Straw bale walls: use as thermal mass and insulating foundation walls in cold climates; plaster for durability.
- Modular salvage framing: use pallet timber, reclaimed steel or concrete blocks to lower costs.
Decision matrix (step‑by‑step):
- Rank priorities: portability, cost, durability, insulation. Assign weights (e.g., insulation 40%, cost 30%, portability 20%, durability 10%).
- Score materials against priorities and pick the highest scoring solution.
- Buy a sample panel and test cutting/fastening before committing to the full order.
Exact starter material checklist: 2×4 studs (8′ lengths) for walls, 4×4 posts for corners, 2×6 ridge or engineered header for roof spans, 2’×4′ twin‑wall polycarbonate panels, #10 exterior screws, EPDM gaskets or foam glazing tape, exterior grade caulk. For suppliers, see Palram polycarbonate panels and Inkbird/Autogrow climate controllers in resources.

Construction tips: foundation, roofing pitch, panels, lifting & common pitfalls
The creator describes a hand‑poured 4″ concrete floor using about 15 × 50 lb bags of concrete for a modest greenhouse and a steep 45° roof pitch that shed snow well (08:00–09:30).
Metrics and alternatives you can apply:
- Concrete slab: 4″ slab is adequate for carts; the creator used ~15 bags for his modest footprint — scale proportionally for larger areas.
- Gravel base: a compacted gravel base with a frame and paving flags can save 30–60% on concrete costs and improve drainage.
- Roof pitch: 45° or steeper is useful where heavy snow is expected; in low‑snow areas 20–30° is sufficient and uses fewer materials.
Step‑by‑step build sequence (numbered):
- Site prep: clear vegetation, confirm level (≤5% slope), stake layout.
- Foundation: choose slab, compacted gravel, or edge beams; set anchor points for frame.
- Frame: build wall studs, install ridge beam (use team lift; creator lifted a 200+ lb ridge beam alone—safety warning at 09:00–09:50).
- Rafters & roof: attach rafters and purlins; install roofing underlayment if recommended for your glazing.
- Covering: pre‑cut polycarbonate panels and use foam tape or EPDM gaskets to seal ribs.
- Sealing & weatherproofing: caulk joins, install flashing and roof caps.
Common pitfalls and fixes:
- Underestimating the ridge/beam weight — always have at least two people for heavy lifts.
- Poor drainage — add a shallow perimeter trench or gravel under slab to avoid water pooling.
- Improper panel fastening — use manufacturer‑recommended screws and washers and allow for thermal expansion.
Safety & permitting: check local codes before pouring concrete or running permanent services. The creator’s timeline and hard lessons around the ridge beam (09:00–09:50) highlight the value of planning lifts and getting help.
Environmental controls: ventilation, cooling, heating, lighting & automation
The video mentions that electricity and running water significantly increase greenhouse usability (10:30–11:00). This section expands that into modern environmental controls and automation (2026 options included).
Ventilation and cooling facts:
- Passive ventilation: ridge vents plus side louvres or roll‑up sides are low‑cost and reduce peak temps by roughly 10–25% depending on wind and opening area.
- Active ventilation: exhaust fans with thermostats provide consistent cooling; pair with intake louvers sized to provide 10–30 air changes per hour for hot summer use.
Heating and lighting:
- Heating: radiant oil or small electric heaters with thermostats are common; estimate heat load and add 10–15% for safety.
- Lighting: LED grow lights for overwintering and propagation — a common spec is 25–40 μmol/m²/s for seedlings and up to 200 μmol/m²/s for production crops; use timers or spectral controls for efficiency.
Smart automation you can add (practical 2026 choices):
- Climate controller (Inkbird/Autogrow) to manage heater, fan and lights with sensor inputs.
- Smart vents with thermal actuators that open/close without electricity for fail‑safe ventilation.
- Wi‑Fi relays and soil moisture sensors to trigger irrigation — affordable Inkbird Wi‑Fi relays and environmental controller bundles are widely available.
Actionable install checklist:
- Decide desired air changes per hour and select fan and intake sizes accordingly.
- Buy a climate controller with at least two relay outputs (heater + fan) and sensor suite (temp + humidity + optional CO₂).
- Install LED fixtures on dedicated circuits and use daylight/photoperiod timers for propagation schedules.
Link to recommended controllers and smart vents in the resources section; these systems let you run a greenhouse more sustainably and reduce manual labor while improving crop consistency.

Irrigation, soil, hydroponics, composting and raised beds
The creator references storing soils and trays inside the greenhouse (01:20–02:20). That implies the need for planned irrigation and soil management to keep that stock usable and organized.
Irrigation options and data:
- Drip irrigation: saves roughly 30–60% water versus overhead sprays; great for production beds and containers.
- Hydroponics (ebb‑and‑flow): can increase growth rates by about 20–30% for leafy greens and maximize propagation throughput.
- Capillary mats: ideal for seed trays; maintain consistent moisture for seedlings and cuttings.
Composting and soil strategies:
- Attached compost bay: build a 3‑bin cold compost system adjacent to your greenhouse for quick access to aged amendments.
- Vermicompost: worm bins provide high‑N tea for seedlings; keep worm beds shaded and protected from extreme heat.
- Potting mixes: seed‑start mix (70% peat or coir, 30% perlite), potting mix (40% compost, 40% coir, 20% perlite), heavy veggie mix (50% topsoil, 30% compost, 20% sand for drainage).
Step‑by‑step selection process:
- Decide crop mix (seedlings vs production greens vs fruiting crops) — seedlings favor capillary mats/hydroponics.
- For hydroponics, size reservoir: for a 4’×8′ ebb bench, a 20–40 gallon reservoir with a 400–800 GPH pump is typical.
- Install a pressure regulator and filtration for drip systems; plan backflow prevention if connected to potable water.
Actionable recommendations: commit to one irrigation platform first (drip or ebb), size pumps and reservoirs conservatively, and plan composting near the greenhouse to close nutrient loops. The video’s tray and soil storage scene (01:20–02:20) shows how critical planning is to avoid clutter and wasted materials.
Plant selection, layout & vertical gardening for maximum harvests
The creator emphasizes starter plants and throughput (01:20–02:00). Use that to plan what to grow and where inside your greenhouse.
Plant compatibility matrix (practical):
- High‑heat crops: tomatoes, peppers, eggplants — need full sun, space, and support; place on the south side.
- Cooler tolerant crops: lettuce, spinach, brassicas — put these near cooler edges or along north walls.
- Vertical crops: cucumbers, melons, pole beans — benefit from trellis systems and vertical racks.
Vertical gardening specifics and yield data:
- Stacked planters and vertical towers: can increase productive area by 50–200% depending on stacking density.
- Yield per sq ft: with vertical trellises and succession planting you can often double annual output per floor area compared with flat benching.
Actionable layout plan (4 steps):
- Place propagation benches near the door and utility hookups for easy access to power and water.
- Reserve the south side (or the brightest side) for tall fruiting crops and installed trellis frames.
- Install vertical trellis runs along the long walls (east/west if you used that orientation) to keep central aisles clear.
- Plan rotations: use a 6–8 week succession schedule for seedlings and a 12–16 week rotation for salad greens to keep throughput steady.
Practical tips: use modular trellis panels that can be removed and stored when not needed; use mesh netting for heavy fruiting crops to reduce stress on vines; and label plant families to avoid disease carryover. The video’s emphasis on starter plants (01:20–02:40 and 03:30–04:00) shows why a propagation‑first layout will pay off for production or sales.

Organization, aesthetics, landscaping and integration into your garden
The video shows accumulated clutter and the need for organization (02:00–03:30), which directly affects workflow, pest pressure and aesthetics. A tidy greenhouse saves time and improves crop quality.
Practical organization systems:
- Tool walls: pegboard or slatwalls to store hand tools, pruners, and labeling trays.
- Modular shelving: 18″ deep shelves along walls for pots and small trays; keep the center aisle free for carts.
- Labeled staging areas: dedicated bins for seed packets, fertilizers, and used trays to maintain inventory control.
Landscaping and integration tips:
- Windbreaks: plant a deciduous hedge or install a lumber fence on the prevailing wind side to reduce heat loss in winter.
- Permaculture swales: contour the site to catch runoff and recharge groundwater into garden beds — useful where water capture matters.
- Aesthetics: use exposed timber, painted trim, or reclaimed window accents to blend the greenhouse with garden architecture.
Actionable 3‑step routine and hardscape plan:
- Designate a 20–30 sq ft storage footprint for soils and trays; install a gravel base for easy cleanup.
- Create a weekly 15‑minute tidy cycle: sweep aisles, stack trays, drain trays and dispose of spent plant material.
- Lay a simple hardscape: 18″ wide paver path, 6″ gravel shoulders, and a small rain catchment barrel for irrigation supply.
Unconventional materials like reclaimed windows or living roofs can make the greenhouse feel like part of the garden rather than a machine — the video’s cleanup scenes (02:00–03:30) are a realistic motivator to start with organization from day one.
Cost, timeline, permits and when to build — practical budgeting for DIY greenhouse design
The creator recommends building in late summer so paint and concrete can cure properly (09:30–10:00). Timing matters for material workability and fewer storms.
Ballpark budgets and cost‑saving facts:
- Hobby greenhouse (8’×12′): typical DIY budgets range from $1,000–$4,000 depending on glazing and foundation choices.
- Custom larger builds: $5,000+ when using polycarbonate, concrete slabs, electrical and plumbing.
- Panel cost tradeoff: polycarbonate costs more upfront than plastic sheeting but lasts 5–10+ years and reduces heating demand, often giving payback over time.
Cost‑saving techniques:
- Pour a minimal slab or use compacted gravel rather than full concrete footings.
- Source reclaimed framing lumber and salvage windows to lower glazing costs.
- Buy pre‑cut polycarbonate panels from local suppliers to reduce waste.
Permits and timeline checklist (practical):
- Check local building codes for structure size/height thresholds—call the building department if in doubt.
- If you plan electrical work, prepare for an electrician-permitted connection—DIY wiring often requires inspection.
- Suggested timeline: site prep (week 1), foundation & frame (week 2), ridge/rafters & cover (week 3), systems & finishing (week 4–6).
Actionable next steps: create a one‑page budget including materials, tools, and labor (if you’ll hire help). Use the creator’s timeline and build cues (09:30–10:10) to plan a late‑summer start in 2026 and target system installations (electrical/water) during week 4 when the frame is weatherproofed.

FAQ, resources, next steps & conclusion — wrap up and immediate actions
This final section ties practical next steps, links, and answers together and includes a short conclusion with key actions. The Ripe Tomato Farms video (https://www.youtube.com/watch?v=TjfwegTGYKc) is referenced throughout; the creator explains practical choices and shows hands‑on clips for many of the topics above.
Resources & links (recommended):
- Original video: Tips For Building Your Own Greenhouse (The Ripe Tomato Farms).
- Channel page: The Ripe Tomato Farms.
- Polycarbonate panels (sample supplier): Palram.
- Climate controllers / relays: Inkbird and Autogrow.
- Hydroponic starter kits (example): search for “ebb and flow hydroponic kit” for 4’×8′ bench kits at major retailers.
Downloadable suggestions: make a site‑assessment worksheet, materials shopping list, 6‑week build timeline, and an irrigation sizing calculator before you buy materials.
Conclusion — key takeaways & immediate actions:
- Decide your priorities: choose between portability, insulation, and budget; let that drive material choice.
- Do the site survey this weekend: map shade, measure slope and mark utilities — these take under 2 hours.
- Pick one immediate task: order a sample polycarbonate panel, sketch a bench layout on graph paper, or price local permit requirements.
As the creator demonstrates at multiple points (see 04:00–05:20 on sizing and 06:40–09:00 on materials), careful planning saves time and money. Use the resources above, watch the original video for visual context, and take the first practical step now: perform the site survey and sketch a layout. Happy building and growing in 2026.
Frequently Asked Questions
Will a greenhouse pay for itself?
A greenhouse can pay for itself, but it depends on what you grow, how intensively you use it, and whether you sell plants. The creator explains he grew thousands of starter plants in his zone 9 setup (see 01:20–02:20) — commercial seedling sales or a big increase in vegetable yields shorten payback. Estimate extra harvest weeks for your hardiness zone, multiply by expected yield/value, and compare to build and operating costs to check payback.
Should I use glass or polycarbonate for my greenhouse?
Polycarbonate gives about double the R-value of single-pane glass and is more impact resistant; glass provides unmatched clarity and longevity but is heavier and more expensive to frame. As the video notes (07:30–08:30), polycarbonate is easier to cut and insulates better — a practical choice for many DIY builds.
Do I need permits to build a greenhouse?
Often yes—small hobby greenhouses sometimes escape permits, but rules vary. Check local building codes for structures over a certain footprint or height, electrical work, or permanent foundations. The creator recommends late-summer builds and checking permits for major builds (09:30–10:10). Contact your local building department if your planned slab, permanent walls, or electrical lines exceed local thresholds.
How do I prevent my greenhouse from overheating?
Prevent overheating with orientation, passive ventilation, and shading. The creator suggests north–south orientation in warm climates to improve airflow (06:10–06:40). Add automatic vent openers, shade cloth rated 30–60%, and consider evaporative cooling or cross-ventilation — passive measures can cut peak temperatures by roughly 10–25%. Start with orientation and ventilation before glazing choice.
What irrigation options work best in a greenhouse?
For small propagation benches, use ebb‑and‑flow or capillary mats; for larger vegetable production, a drip irrigation system is efficient. Drip irrigation can save 30–60% water compared with overhead watering, and hydroponics can speed leafy-green growth by 20–30%. The video references storage and trays (01:20–02:20); this article expands to recommend pump sizing and reservoir volumes for common bench sizes.
Key Takeaways
- Start by choosing size, height and cover—these three decisions determine most downstream costs and workflows (creator discussion at 04:00–09:00).
- Polycarbonate panels give superior insulation and impact resistance compared with single‑pane glass; they’re easier to cut and install (07:30–08:30).
- Plan ventilation and irrigation before closing up the frame—passive vents, fans, and drip or hydroponic lines are simpler to integrate early (10:30–11:20).
